Showing posts with label DIY. Show all posts

Monday, October 15, 2018

DIY Disney Glitter Ornaments

DIY Disney Glitter Ornaments


I am a Disney Cruise addict, and with that comes my addiction to Fish Extender programs while onboard.  My husband and I are sailing again next week (with no kids!) and while I didn't want to do a full Fish Extender group, I couldn't resist some sort of exchange.  I joined a Magnet Exchange and an Ornament Exchange.  I made glitter ornaments for one of our other cruises, and wanted to make them again this time around.  I have had several people ask how to do them, so I am putting a DIY tutorial together.  They really are easy to do, and they are so pretty.  If you make your own, I'd love to see how they turn out!

Materials Needed
-Disc shaped plastic ornaments
I prefer the disc shaped plastic ornaments.  I don't have to worry about them breaking, and the flat front is much easier to lay a vinyl design on.
- Clear Polycryclic 
I used this and found it at WalMart. You should be able to get it at any hardware store as well.
- Extra Fine Glitter
Make sure you get Extra Fine Glitter because regular won't work well.  I've used brands from WalMart and Hobby Lobby and both have worked great.
-Small funnel (optional)
-Ribbon 
-Oracle 651 Vinyl and a Silhoutte or Cricut type cutting machine
You can also purchase premade designs from Etsy if you don't want to make them yourself.


Step One
Remove the cap from the ornament and pour some of the Polycrylic inside.  Swirl it around until all areas are coated and then allow all excess to drip out (I just pour it back into the can).  I also dab the outside edge with a paper towel to keep glitter from sticking to the top.

Step Two
Using a small funnel, pour glitter into the ornament.  I then swirl the ornament around until I've fully covered everything, lightly tap the sides of the ornament, and then I dump the excess glitter back into the bottle. I leave the ornament cap off and let them dry overnight.


Step Three
Choose what design you'd like for the ornament.  I've created my own in Silhouette Studio, but this time I purchased the SVG files from Etsy and then edited them and cut them with my Silhouette. They are usually $3 or less and it is so nice to not spend forever creating an image. Just search whatever type of image you are looking for and include SVG in the search text. For this project I purchased one pack that had a ton of Disney Cruise options and then bought the Mickey bats from another seller. You can choose how large you'd like the design to be, but there is a slight curve on the disc shaped ornament which can make laying it flat a little difficult.  I sized down the ship for these (around 1"x1.5") and then added the Mickey bats to fill the space.  You can play around with things and see how it works best for you.  Oracle 651 is your best option because it is a permanent vinyl.  


Step Four
Add ribbon to hang the ornament with and you are done!  

Check out my other blog entries for more Disney Cruise DIYs and planning tips! 

Thursday, March 10, 2016

Disney Cruise Stateroom Door Decorations


We've taken two Disney Cruise vacations now, and one of the things that my family loved to do was decorate our stateroom door.  It made it easy for the kids to find our room when we went down the hallway and it was really fun to see how others had their doors decorated.

The major rules that you have to follow is that you can't use any type of adhesive stickers on the doors or anything that goes over the top of the door (like over the door closet hooks, etc).  The doors are metal and everything must be hung using magnets.  You need a pretty heavy duty magnet and I've tried two different kinds.  On our first cruise I bought a roll of adhesive backed magnets that were labeled as heavy duty.  They were a little pricey, but I could cut them in the sizes I wanted and stick them on my projects (like these Fish Extender gifts I made here).  They didn't end up being quite strong enough to really hang well on the stateroom doors.  Sometimes we'd come back to our room and we would find a few decorations had slid down the door or were on the floor.  I found some adhesive backed magnetic buttons in the craft section at Walmart (only sold in stores) and used those for our next last cruise.  They worked perfectly and they were cheap at 18 for $1.97.  I added a little E6000 glue along with the adhesive sticker because I wanted them to really stick.  

These are what I used...
 

You can really do anything you want for your door decorations.  I wanted to keep with a Mickey Ears theme, so I found a template (I liked this one) and added my own designs to the inside of the ears in Microsoft Word.  I did one for each member of our family with their name and their favorite Disney character.  I also did a bunch of our favorite sports teams (and a CO flag) to show our Colorado pride.  I made one specific to our cruise for the second trip because I had someone from our cruise group (more on joining a group here) make one for us on our first trip that I loved having.  I had also seen a lot of cute character decorations to put around the round part on your door that has your stateroom number on it.  I found some really great templates on Pinterest and used this one to print a Pirate Mickey.  Really, you can do whatever you want.  I saw people with battery operated lights that they hung on their door, decorations for birthdays, anniversaries, etc.  Get creative!

To design my decorations, I used Microsoft Word.  I inserted the picture template, inserted another picture for the design I wanted, added a text box, and then played around with sizes.  I saved one and then kept that size and used it for the rest that I made.  I printed them, cut the design out, and then laminated them.  Make sure you cut the paper to the shape you want it prior to laminating, then laminate, then cut the plastic down to the correct size.  If you cut the paper after you laminate, there won't be anything to hold the seal and it will separate.  I have this Scotch Laminator and absolutely love it.  I got it as a gift and then bought extra 5x7" and 8.9x11.4" sheets from Amazon (much cheaper!)  After laminating, I glued a few magnets on the back and then stuck them all in a ziplock bag to pack in my suitcase.  You can read about my packing tips here. 


I somehow forgot to take a picture of our stateroom door on the first cruise, but managed to remember to do it on the last night of our second trip.  Side note, I let my seven year old daughter arrange the door and had to stop myself from moving things around every time I looked at it.  I thought about moving things around for the picture, but this is how she wanted it so I left it be.  We were also gifted some fun magnets from our Fish Extender group (more info on Fish Extenders here) that we loved adding to our door.


Decorating your door just adds a little more magic to an already magical Disney Cruise vacation.  It can be as simple or as complicated as you want to make it, but it adds a fun touch that my family really enjoyed.  If you aren't creative, I'm sure there are Etsy shops that sell pre-made decorations, or you could do simple stuff with Disney scrapbooking paper.  Make whatever you want and have fun with it!

Tuesday, February 17, 2015

Disney Fish Extender Gifts for Kids!

These are the Fish Extender gift bags I put together for our upcoming Disney Cruise!  If you aren't familiar with Fish Extender gifts, you can read more about it in the post I wrote about the gifts I did for the adults in our group here.

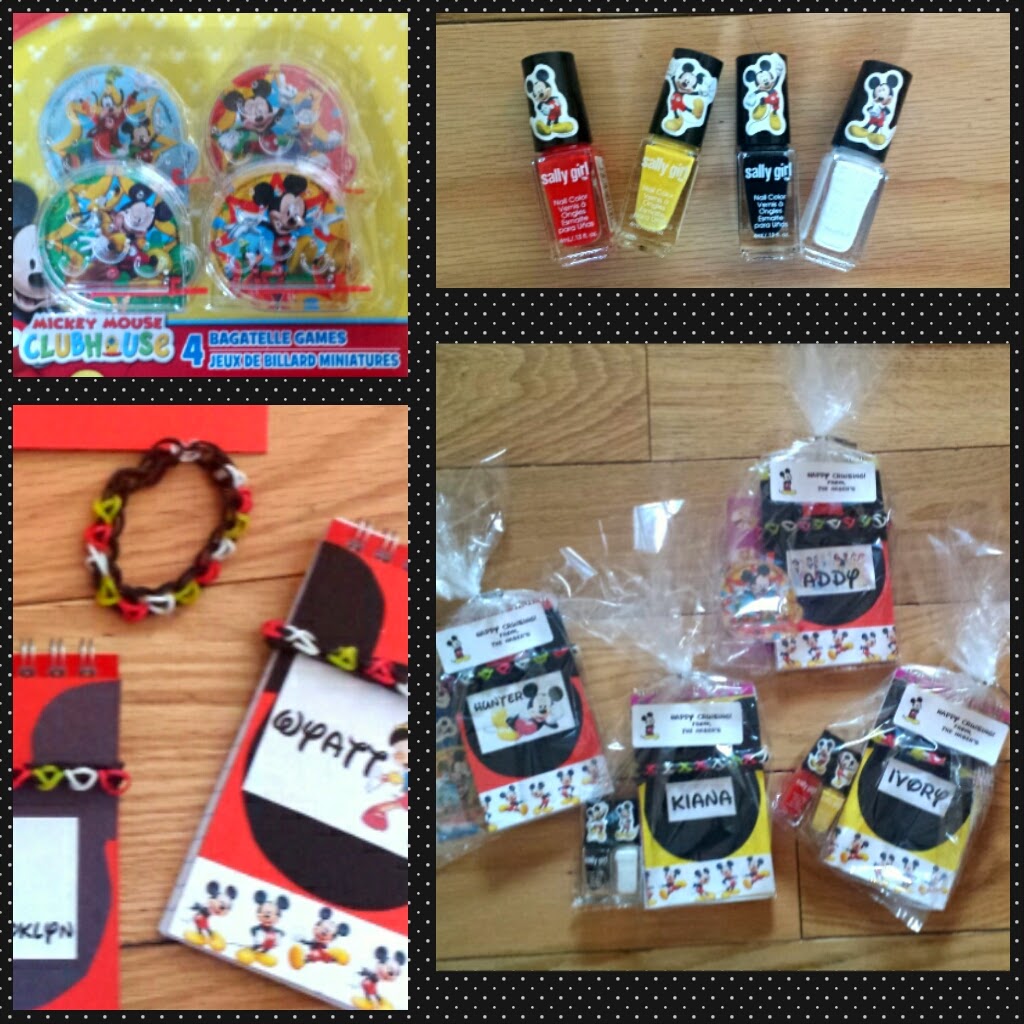
We had 25 kids in our group to do gifts for, and their ages ranged from 10 months up to 13 years old.  It was a little tricky trying to come up with something that most everyone would like without having to do a lot of different things.  I also wanted to incorporate each child's favorite character (this was provided in the list for our group), and again wanted something that wouldn't take up a huge amount of space in our suitcase.  In the end, I decided to make some little personalized notebooks for each kid as the main gift, and then throw in a couple little items to go.  

I got 3 packs of spiral notebooks for $1 each at the Dollar Tree store.  The covers were tinted plastic which I knew I'd need to cover.  I cut rectangles out of cardstock paper and attached it to the outside and inside of the plastic cover sheet.  I used spray adhesive to glue the paper on because regular glue won't adhere to plastic.  Once thaMt had dried, I cut out the Mickey Mouse head shape from black cardstock and glued it on with a permanent glue stick.  I made each of the kid's name tags in Microsoft Word by typing their name in the Disney font and then adding an image.  I just printed them, cut them out, and then glued them on top of the Mickey head.  I also added a strip of paper at the bottom that I cut from some Mickey Mouse scrapbook paper.  

For the extra goodies, I did a small sheet of stickers for each kid, and also a little Mickey Mouse ball game that I got at Dollar Tree in packs of four in the party favor aisle.  For the couple of teenage girls in our group, I got itty bitty bottles of nail polish in Mickey colors and then added the Mickey stickers to the top.  My kids wanted to be part of the process (or I may have told them they needed to be...), so they made a Rainbow Loom bracelet for each of the kids using this pattern from Loom Love.  I slipped the bracelet around the notepad, added the stickers and game to the bag, put on a label that I made, and that was that.  
I had so much fun putting the Fish Extender gifts together!  I can't wait to see the gifts we get from our group, and I definitely will do this again when we do another Disney Cruise!

Monday, February 16, 2015

Disney Fish Extender Gifts for Adults

We are going on our first Disney Cruise this week, and I have done a ridiculous amount of research for the trip.  When I read about Fish Extenders, I knew we had to do them.  One, I love to craft, and two I love to give gifts, so it was a win/win for me. 

The first thing you need to do when you decide to to do a Fish Extender (FE) program is join a group.  If you skip this step, you'll end up leaving gifts for other people and not receiving anything.  If you go to the Disney Cruising group on Facebook, you'll be able to locate your specific cruise date/ship and join a group.  I love our group on Facebook where we can all chat, ask questions, and get to know each other.  It has been a very valuable tool for me.  I can't wait to meet everyone on the ship!

You'll also need to have a FE to hang outside your stateroom door.  You can buy them already made (tons on Etsy), or you can make your own.  I sew, but hate making patterns, so I bought a pattern on Etsy for $4.50 from The Rabbit's Hole Shop and it was worth every penny.  

Here is a picture of the one I made...


For our group, I made gifts for the kids and for the adults.  In this post, I'm going to show you the gifts I made for the adults.  Kids FE gift post can be found here.

I wanted to make gifts that were functional, but also could be kept for souvenirs from the trip.  I also wanted something that was light weight and easy to pack.  The doors on the Disney ships are magnetic, so for one gift I made a little dry erase board to hang on the door and added a magnetic dry erase marker with it.  I cut 5x7 sheets of white paper, got the Disney Cruise Line logo online and added the text to it I made these into stickers), and then cut some Mickey Mouse scrapbook paper to add as trim to the bottom.  I got a Scotch Laminator for Christmas (Thanks brother!) and used 5x7 sheets to laminate the boards I'd put together.  
 I bought a roll of adhesive magnets, cut them and attached them to the backs of the boards.  

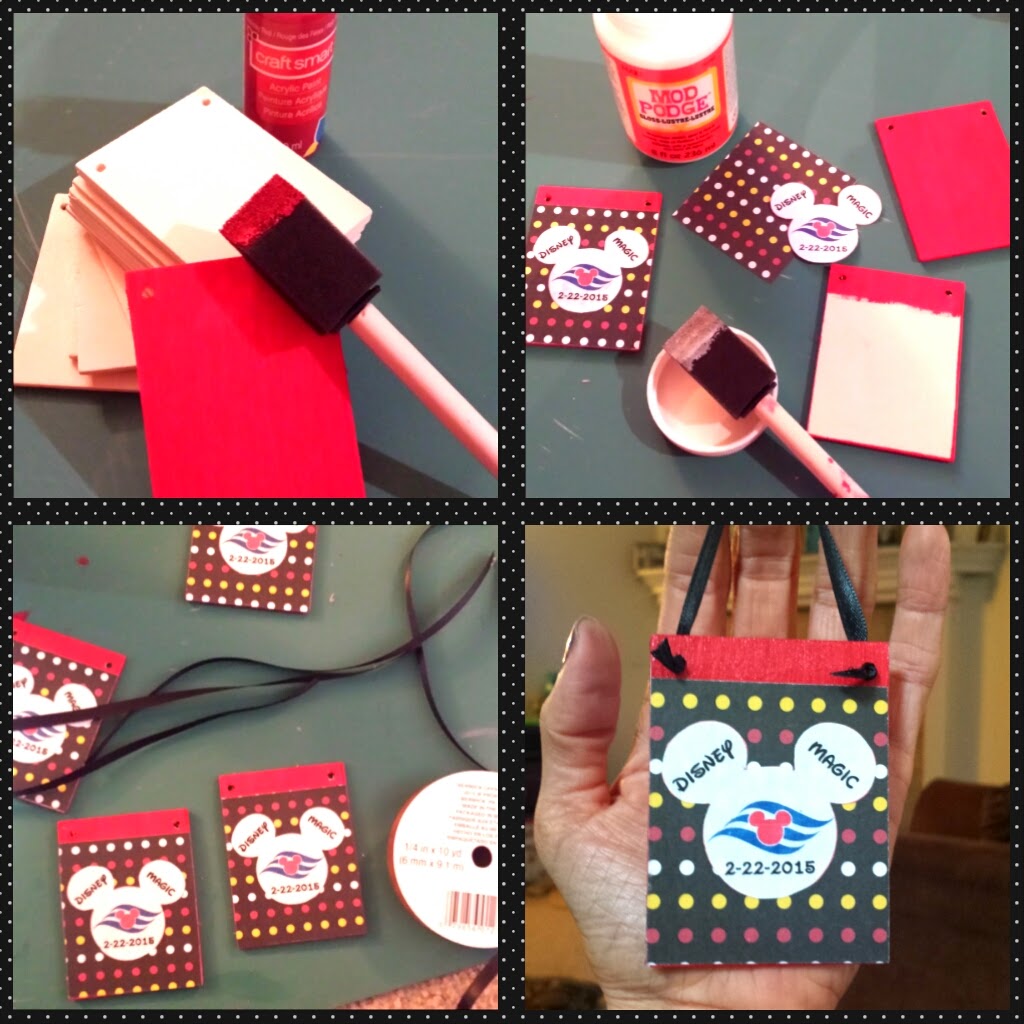
The other item I decided to make was a Christmas ornament.  I thought it would be a fun thing to hang on the tree each year and to remember the trip by.  I bought some wooden rectangle plaques that  already had holes drilled (ArtMinds brand at Michaels that came in a pack of 8 for $1.99).  I painted them, cut out squares of scrapbooking paper (from the same Mickey Mouse pack I used above),  made the Mickey ear shaped logos with the cruise ship name and date, and used Mod Podge to attach everything.  I then cut ribbon, threaded it through the holes and knotted the ends.  I finished the ends with a fray stopper, but you could use heat to seal the ends as well.  

I got clear bags from the Dollar Tree store and packed the gifts up with some little labels I made.


Monday, June 23, 2014

Kids Chair Refinish Project


A couple facts: I love elephants, and I love projects.  My neighbors across the street were in the process of moving a couple months ago, and I spotted a little chair with an elephant on it in their driveway with their stuff they were having picked up for charity donation.  I sent her a quick text and asked if I could have it, and then sent my kids over to pick it up.  

It was an adorable little metal chair, with peeling white paint, some rust, and a faded seat.  I knew I could bring it back to life and that it would be perfect for my daughter to lounge in on the deck.  


I started working on it by taking the seat off (there were 12 screws holding that tiny seat on!)  Next, I sanded the areas that were rusted, and then primed it with a spray primer for metal.  The trim on our house is a light tan color and I wanted something that would coordinate with that.  The fabric I picked (Outdoor canvas fabric from JoAnn Fabrics. Normally $19.99/yard, but it was on 50% off that week) was a mix of turquoise, tan, and white, so I went with an Almond color for the metal part of the chair.  I sprayed two coats and that was that.  

I decided to use the existing seat for the chair and just cover it with new fabric.  I laid the seat on the fabric and just eyeballed how much to cut out.  Getting it back on the chair was tricky, and would have been easier if I had a couple extra hands to hold the fabric tight, while I screwed the screws back in.  No such luck on the extra hands, but I made it work.


I think it turned out great, and my daughter is thrilled to have her own little chair to sit in!


Wednesday, January 29, 2014

DIY T-Shirt to Little Girl's Nightgown Refashion

My kids have become big hockey fans and we've gone to a few of our local minor league games recently.  At the last game we went to, my daughter caught one of the pink t-shirts that the cheerleaders were tossing into the crowd.  She was very excited, but she is five years old, and the shirt was a Womens Large size.  I wear an XS and was never going to wear it, so I wanted to find a way for her to enjoy it.  I decided to make it into a nightgown for her to sleep in.


 My plan was very basic, and there was nothing exact about it. If you are someone who needs precise measurements, you should probably just stop reading at this point. :)  I started by laying the t-shirt flat on my cutting mat and placing one of her nightgowns on top of it.  Next, I eyeballed 1/2" or so around it and put a few pins in the shirt around the shape of her nightgown.  

Next, I sewed the new seams starting at the bottom and ending at the cuff of the sleeve.  I just sewed a line and pulled the pins out as I went.  I had Little Miss try it on really quick, was happy with the fit, and then moved on.  I could have just cut off the extra fabric and left it alone because knit won't unravel, but I decided to just cut it by running down the seams with my serger.  Quick, easy, and even though it is just a nightgown, I like having the seams finished.

This project was super quick, easy, and now my little hockey fan can enjoy her prize from the last game.  


Friday, January 3, 2014

Closet Shelf Organization

I have a tall set of shelves in my walk in closet that I've tried many, many times to organize.  Here's how things typically go...shelves are a mess, I straighten them but don't love the result, gradually they become less and less organized, and then I repeat the steps.  This time I wanted to make them organized in a way that made sense to me, and in a way that would be easy to maintain.

 I have always kept handbags, shoes, and swim suits/cover ups on these particular shelves, although they really aren't set up to store that type of thing.  I'm they type of OCD person who wants things perfect, but if I can't get them that way, I just pretend it doesn't exist until I can't take it anymore.  The shelves in my closet are pretty deep from front to back and I hadn't ever figured out an ideal way to do things, therefore I always end up with this after a few months...


Completely horrifying, I know.  Fact of the matter is, when I open my closet door and walk in, the door blocks these shelves, so it is pretty easy for me to ignore the problem.  Until the shoes start falling off the shelves, and block the door from opening anyway. :)

I set off to the Dollar Tree store and to Target the other day (with my kids in tow, which turned out to not be my best decision of the day) on a mission to find a new solution to the shoe and swim suit problem in my closet.  The Dollar Tree was a great choice.  They had tons of fun, bright colored storage bins, and of course you can't beat the "Everything's $1" price tags.  $3 later I had the perfect bins for my closet.  Next, we went to Target to find small, white, tension rods.  I bought 28"-48" rods for $2.98 (on sale...a whopping 5% discount folks!!), and ended up grabbing eight of them because I wasn't sure how many I'd need.

After I got home, I threw all the shoes on the floor and went to work.  The top shelf I only used one rod, I put it up high and to the very back, and I hung all of my heels from it.  In front of there I just lined up all my boots and wedges that were either too tall to hang or didn't have heels to hang from.  


On the next shelf, I had to get a little more creative.  I used two tension rods about four inches apart up towards the back, and then another set several inches below the top set.  On these, I put my flats.  There as enough space below the second set to put another row of shoes directly under, and almost enough to put another in front of that.  My shoes aren't small, I wear a size 10, so they take up a lot of space.  I added a tension rod at the same level as the shelf, but about three inches in front of it, and rested the toes of another row of shoes on that.  

Next I divided all of my swim suits, cover ups, and flip flops and put them each in their own storage bin.  I used another tension rod to extend my shelf a bit so that I could fit all three bins together.  I stuck my running shoes on there as well, since I didn't have room for them up above. 

Below the bottom shelf is where I keep all of my tall boots.  I cut up a pool noodle (thanks Pinterest!) and used the pieces to hold the boots up straight.

 This project was a pretty simple one, but I think will make a huge difference for me.  I feel like I finally have a set up that will be easy to maintain and where everything is easy to access and find.  Now maybe my husband will stop saying things like "I feel like there has to be a better use for that shelf area back there." :)

Before/After


Wednesday, December 18, 2013

Folding Chair Refinish - Easy DIY

I recently refinished a desk to make a Lego table (you can see it here) for my son's room and he needed a chair to go with it.  I didn't want to buy one, so I went down to our basement and found an old folding chair that was not looking very lovely.  It had paint on the seat, but otherwise was in great shape.  The boy wanted some cushion on his chair, so this would be perfect.

I popped the seat cushion off and went right to the spray paint.  I used the same color red that I used on an old school desk that is in my son's room, and I thought I'd have enough to finish this chair.  I ended up running out and had to go get another bottle, so I the first thing I had to pay for was a $3.77 can of paint at Wal-Mart.  I had to put several coats of paint on, which seems to happen any time I use red on anything.  It takes a lot of it to get full coverage.  

After a couple coats...I didn't worry about the seat because it was getting covered with the cushion.

I bought a yard of navy blue fabric at Hobby Lobby, which was more than I needed for this project, but it was $3.99/yard and I also had a 40% off coupon.  I put the fabric over the old cushion cover because I didn't want to damage the foam on the cushion if the old cover had adhesive on it.  This part took about 3 minutes to complete.  I ironed the fabric, laid the cushion on it, and cut around it with about 1.5" of allowance for folding it under.  I didn't worry about cutting perfectly because the bottom wasn't going to show, and clearly they didn't care when they put the original cover on either.  Next I sprayed the cushion with spray adhesive (which I had on hand already), put it on the fabric, and folded it around.  I sprayed the edges on the back side and also put a few staples (pretty sure I could have skipped that step though) around the edges. 


Once the paint was dry, I just popped the cushion back on and I was done.  I can now consider my Lego desk project complete! 

Before/After


 Desk/Chair 


Sunday, December 8, 2013

Boring Desk Refinish - Lego Desk Fun!

My son loves Legos.  He has an insane collection of sets, but the problem is that once he builds them, he doesn't have a good way to store them, so they just get dumped in buckets and never rebuilt.  It drives me crazy because the sets are pricey, and I hate that he only builds them one time.  I've been scouring the good old internet for ideas for Lego tables, but he is almost 10, and everything I find seems geared toward much younger kids.  We rearranged his room last week, and I told him we would go find a desk to refinish for his new Lego table.  

We headed out to my beloved local Re-Store last Wednesday with our fingers crossed.  We wandered around, not falling in love with anything.  There were a few pieces that were just okay, but nothing we really loved.  Eventually we stopped and looked at a roll top desk (which was not what we had in mind), and the more we stood there looking at it, the more potential we saw in it.  It was $60, which was more than we had wanted to spend, but we were there on "Spin the Wheel Wednesday", so we knew we could spin and get anywhere from a 5% to a 40% discount.  We put a hold on it, and then went back later in the day with my husband.  At the checkout, my son spun the wheel and was grinning from ear to ear when it landed on 40% off.  $38 including tax and we were on our way!


The desk only took up space in our garage for a few days and then I had to get to work on it.  Below freezing weather was headed our way, and my husband wanted his parking space back. :)

I started by washing the desk with a damp cloth and then repairing a couple small holes.  I removed all the hardware (my son didn't like any of it because, and I quote, "it looks old fashioned, and I want it to be modern") so I wasn't going to reuse it.

Next I made chalk paint (I mix 2 tbsp unsanded grout in 3 tbsp of water, and then stir it into 1 cup of paint...other projects I've done with chalk paint here, here, and here).  I had the quart of paint on hand from a free offer that Glidden had awhile back.  I used it to refinish an old school desk that is aleady in my son's room, and he wanted the big desk to match it.  I painted two coats, let it dry for a day, and then brushed on a coat of polyurethane (which I had on hand already as well)
 for extra protection.  

Paint and Polyurethane I used...

With two coats of paint...

After Polyurethane

I ordered four 10"x10" Lego base plates from Amazon (they were on sale for $3.94 each) and attached them to the desk using Simply Tacky.  I originally planned to glue them, but liked the idea of using the Simply Tacky product because I wanted to be able to easily remove the plates someday.  I knew using craft glue would make that difficult and worried about potential damage to the wood.  I just peeled little bits off, pressed them to the back of the plates, and stuck them to the desk.  It was easy to re-position them and they are stuck on there well enough that won't lift off when he plays.


The next task was to find hardware for the drawers.  It took a trip to four different stores to find what I was looking for... modern, yet appropriate for a boy's room.  I found that things were either very ornate, or silver, or I couldn't get handles and knobs that matched.  Finally found triumph at Home Depot and it only cost me $11.51 for five knobs and four handles.  

As soon as I had the knobs on, my son went right to filling the drawers and setting up his minifigures, so I didn't get a picture before everything was added.  Here is the final, and much loved product.  This was definitely one of my favorite projects that I've done so far.


Thursday, December 5, 2013

Kids Chore Chart DIY

I've done chore charts with my kids for a long time, and have tried all different kinds.  We had an online chart that I loved, but it was very easily "out of sight, out of mind" for the kids.   I got tired of having to remind them to check it, so I gave up and went back to having to ask them 1,824,626 times a day if things had been completed.

For the sake of my sanity, I wanted something right where they couldn't miss it each day, and also something that was by itself.  I didn't want it on the refrigerator because we have other stuff on there already.  I also wanted to use magnets which is why I decided to use a baking pan.  We have a small wall between our living room and kitchen and that's where I wanted to put it.

I bought the pan for $4.50 at Big Lots, the box of magnets for $2.99 at Staples, I used scrap booking stickers I had on hand, and I already had primer and spray paint.  I love projects that cost me less than $10...too bad they aren't all like that!

The pan didn't have any holes to hang it from, so I used a drill to make them.  If you have to drill, just make sure your drill bit is one that can go through metal.  After I drilled I sprayed on a coat of primer (meant for metal as well), and then when that was dry I sprayed the color. 

I used a black Sharpie to draw the lines on the pan, and then added the letters.  I used a silver Sharpie to write the permanent tasks on the magnets, and left other magnets blank for tasks to be added as needed.  

Not much too it.  I finished it while my son was at school today, and when we picked him up his little sister said "You have so many chores to do when you get home."  Based on his response, I don't think he liked what she had to say. Hopefully they enjoy being able to move the magnets to the "done" side and keep up with everything without me having to ask.  Hahahahaha!  A girl can dream right?


Tuesday, November 5, 2013

Fabric Covered Canvas DIY

Before we got our new bed, I had a grand plan for one of the bare walls in our room.  However, when we got the bigger bed, we moved it to that all, thus ruining my plans.  I wasn't sure what I wanted to do with the wall until I found some super fab elephant prints in the BlackBaraoque Etsy shop.  They are printed on antique book pages and are really gorgeous in person.  I have a major thing for elephants, and fell in love with the prints right away.  I originally ordered only one (the elephant w/flowers), because at that point I wasn't sure what to do with it, but felt it needed to be somewhere in my house.  I glanced at the site about a week later, and really, really had to have two others as well.

Once we had a plan for the headboard, I knew that I wanted to put the elephant prints above it.  I loved the elephants with the heart and wanted it to go in the center, but felt that it needed a more dramatic frame to showcase it.  I tend to hang on to things for way too long, and had some old 8x10 silver picture frames (from our old house...that we moved out of 10 years ago) that I could spray paint black.  I had leftover paint from the handles on the dresser refinish I did, so that was easy.  I had fabric leftover from making the pillows for the church pew, so I decided to cover a canvas and then hang the frame on that.  The 11x14 canvas was only $5.99 for a pack of two at Hobby Lobby, making this project pretty cheap.

I wanted quick and easy, and I got it.  I sprayed the frames and set them aside to dry.  For the canvas, I put the fabric face down, sprayed the canvas with spray adhesive, and pressed them together.  Next I flipped it over, sprayed the sides and back edges, and folded the fabric up.  I trimmed the extra fabric off, folded the corners down, and stapled them.  Done and done. 

The only thing left was to hang the canvas, measure where I wanted the other pictures to hang, and hang them all up.  Super easy!  The picture on the top left really isn't hanging crooked...that would send me over the edge.  I just didn't hold my phone straight enough when I took the picture and didn't feel like going back upstairs to redo it.


South Dakota Family Vacation

South Dakota Family Vacation! My family took a vacation to South Dakota when I was a kid and I've always had great memories o...