Wednesday, March 11, 2015
Packing for a Disney Cruise
Our recent cruise on the Disney Magic was absolutely amazing (for help planning check out my Tips for Planning a Disney Cruise post), and a big part of how smooth it went was because I packed almost perfectly. I am a habitual over packer, so to actually use almost everything I packed was quite the victory for me. Here are some of my "musts" for your Disney Cruise as well as a list of of what kind of clothes I took for our family. Keep in mind, we participated in all of the theme nights on the cruise, which I highly recommend doing, even though it does add quite a bit to your suitcases. Our family of four took two large suitcases, one carry on size suitcase, and each of us had a back pack or bag that we carried on.
1. Organize and Label the Kid's Outfits
This is where my OCD tendencies really paid off. There are a lot of things you have to pack, and my kids never keep anything organized once we are on a trip. I knew our stateroom was pretty small, and the thought of having clothes everywhere made me have a minor panic attack. I put the kids stuff in ziplock bags and labeled each one with things like "Daytime", "Dinnertime", "Formal Night", "Swimsuits", and put all the matching accessories in each bag. I kept the clothes in the bags in the drawers in our room so the kids could just grab one and get dressed quickly. It made checking things off my packing list really easy as well. We took the used ziplock bags to store wet swim suits or clothes on the port adventures we took.
2. Storage Containers/Hanging Organizers/Clothespins/Magnetic Hooks
The staterooms are small and space is valuable. I read a blog recommending that you bring a hanging shoe organizer attached to a hanger (you can't use any over the door type hangers), and this was very helpful! There was a knob on the wall by the bathroom to hang it on and we kept our cups, kids shoes, sunglasses, and snacks in there.
Ladies, I also highly recommend taking your makeup/toiletries/jewelry in a hanging bag. I found an awesome one at a local boutique for $7 before our trip and it was perfect. I hung it on the towel rack in the bathroom. You have almost no counter space in the bathroom, so a hanging bag is a must.
I also got a fabric pop up storage box at the Dollar Tree and used it on the desk. We put all our Fish Extender gifts we received (check out FE posts here and here), tickets for port adventures, the kids journals, and anything else that would have cluttered up the desk.
There is a clothesline in the shower and I was so glad someone told me to bring clothespins to hang our swimsuits with!
I used magnetic hooks on the inside of our door to hang our lanyards from. Oh yeah, bring lanyards too! They hold your "Key to the World" which gets you in your room, on and off the ship, and is used to charge stuff to your account as well. I found cute Mickey lanyards at Dollar Tree the day before we left.
3. Over the Counter Medication
One of the ladies from my cruise group mentioned that she packs something for almost any type of situation. I threw in ibuprofen for kids and adults, Pepto for kids and adults, and kids cold medicine. I didn't pack Dramamine because I learned that you can get it for free at Guest Services. The family that we sat with at dinner each night had one of their kids encounter some stomach trouble and went to the staff for some Immodium or Pepto. They were told he had to see the doctor, and then had his Key to the World deactivated and couldn't leave the ship for 24 hours because he wasn't feeling well. If they'd brought their own, they wouldn't have had to miss out on one of the ports.
4. Water Bottles or Cups With Lids
This was another idea I got from all the pre-cruise research I did. There are soda machines (they have water too) available all the time, but they only have small disposable cups. I brought Tervis cups for each of us to use and one sports water bottle. They also let you bring your own beer and or wine on the ship, so having a cup to make drinks in our room was really nice. Make sure you check the Disney Cruise Line website to view their new policy regarding bringing alcohol on the ship. It has changed since we last sailed.
5. Decorations for Your Stateroom Door
Lots of people decorated their doors and it was really fun to see what everyone did. The kids loved having our door decorated because they could easily find our room. You can buy decorations on Etsy, or make your own. I found some templates and printables on Pinterest to make ours and had so much fun putting together things to show off our family's interests. You can really do anything you want, they just have to be magnetic because no adhesives are allowed. I somehow got home without ever taking a picture of our door. I'll put together the things I made and take a picture and post it soon.
6. Laundry Bag
I didn't ever do laundry on the ship (although you can if you want to), but I found it really helpful to have a bag to put dirty clothes in. Some things I read said to bring a pop up hamper, but that seemed like it would take up more space. I got a drawstring laundry bag at Dollar Tree and hung it in the closet in our stateroom.
What kind of clothes to take?!?
I started making my packing list about a month before the trip. At two weeks out, I started adding things to suitcases. OCD tendencies aside, I am a professional procrastinator, so to have everything packed so early was nothing short of a miracle. My husband likes to say "It wouldn't be a vacation unless you were up till 3am packing before we leave." This trip was the first time I've ever been packed ahead of time and gone to bed at a reasonable hour. I attribute that to researching and knowing exactly what to pack, and also to knowing I'd be on a ship and forgetting things wasn't really an option. That being said, I forgot to pack myself any pajamas and had to steal things from my husband.
Here is general breakdown of what I packed. Hopefully this is helpful!
Myself
-Toiletries/Makeup
-Jewelry to match each outfit
-Undergarments
-Casual clothes for each day on the ship
-Casual skirts and dresses for "Cruise Casual" dinners
-Lightweight sweater (only ended up wearing this in theater)
-Knit sundresses for Port Adventure days (our adventures required you to be in your swim suit as soon as you got there, so I just threw a matching dress on over it to wear afterwards)
-Dresses for Formal Night, Semi Formal Night, and our Palo Brunch
-Pirate Costume
-3 Swim suits (this was hard, I usually pack one for each day of a trip!), 2 Cover ups
-Shoes - 1 pair of heels that matched all 3 dressy dresses, 1 pair of nude color sandals, 1 pair of black sandals, 1 pair of flip flops, and the Converse that I wore onto the ship. Again, so hard! I usually pack way more shoes
-Sunglasses
-Workout clothes (One of the few things I never wore on the trip)
Kids
-Toiletries
-Swim suits & Swim shirts (3 suits and a cover up for my daughter, 2 suits for my son)
-Casual clothes for each day on the ship
-Casual skirts and dresses for my daughter, and nice shorts and shirts for my son for "Cruise Casual" dinners. My son could go from day to night in what he wore a lot of times. I brought separate day and night outfits for my daughter.
-Formal Night outfits (dress for my daughter, slacks/vest/tie for my son)
-Semi Formal Night outfits (dress for my daughter, khaki pants, button down shirt for my son)
-Pirate Costumes
- Shoes - My daughter took 1 pair of flip flops, 1 pair of white sandals, 1 pair of black sandals, water shoes, and the Converse she wore onto the ship. My son took 1 pair of flip flops, water shoes, 1 pair of canvas boat shoes (for dinners), 1 pair of dress shoes, and the sneakers he wore onto the ship.
-Pajamas
-Sunglasses & hats
My Husband
-Toiletries
-2 Swim suits
-Casual clothes for each day on the ship
-Nice shorts/shirts for "Cruise Casual" dinners
-Formal Night outfit - Slacks, button down shirt, tie
-Semi Formal Night & Palo Brunch outfits - Slacks, button down shirts
-Pirate Costumes
-Shoes - 1 pair flip flops, 1 pair dress shoes, 1 pair running shoes, 1 pair water shoes, and the Converse he wore onto the ship.
-Workout clothes
-Pajamas
-Sunglasses & hat
Tuesday, March 10, 2015
My Top 10 Disney Cruise Planning Tips
We recently went on our first Disney Cruise (actually our first cruise of any kind), and being the compulsive over researcher that I am, I did an insane amount of research. We booked our trip in August to sail in February, and in that time I read countless blogs, talked to as many people as I could, and planned, planned, planned. Our trip was incredible, and I almost died of happiness when my husband said "You really nailed this. I really appreciate the amount of work that you did for this trip." Totally validated my OCD, folks. :) I didn't want to blog before the trip, because I wanted to see what was worth my time and what wasn't before I gave any advice to anyone. I'm not getting compensated in any way for this, I just want to share my thoughts and experience. So, without further ado, here are my top 10 planning tips.
1. Book Through an Authorized Disney Travel Agent
We were spending a large chunk of money on our trip and I was really hesitant to do that on my own. Through my research, I learned that a lot of agents will give you onboard credit (to use towards anything on the ship...dining, port adventures, spa services, etc) if you book through them. They charge you the same price as you'd pay if you booked it yourself, but you get the onboard credit, plus someone to help you with planning and questions along the way. Carrie Johnson at Small World Vacations was fantastic and I'd highly recommend booking through her.
2. Read Blogs and Utilize Pinterest
I found so much helpful information on Pinterest and through other people's blogs. If you search "Disney Cruise" you'll find countless pins and sites with great information. I created a Disney Cruise board on Pinterest and added things all the time. You can check out my board here... Janae's Disney Cruise Pinterest Board
3. Do Fish Extenders!
This was one of my favorite things about our cruise. My kids loved checking for goodies each time we'd go back to our room, and I loved putting together the gifts that we did. You don't have to be crafty, we received plenty of gifts that were not handmade and we loved them just as much! You can read more about Fish Extenders (FE) in my posts for Adult Fish Extender Gifts and Kids Fish Extender Gifts.
4. Stick With an Inside Stateroom
Our stateroom was on the inside, which meant it didn't have a window or balcony. I thought I might regret this, but I am really glad I didn't spend the money for a different type of room. We were very rarely in our room, and we didn't miss having a view at all. Also, we did have a little trouble with motion sickness, and I think it would have been worse if we could have seen the water moving outside the room. The rooms aren't large, and there is so much to do on the rest of the ship and at the ports, so we really only used our room to change clothes and sleep.
5. Join an Online Group for Your Sailing Date/Ship
I've used online groups and social media for as long as I can remember, so joining a group for the cruise was a no brainer for me. The Disney Cruising page on Facebook can help you find groups already made for as far out as you can book a cruise. That page is full of information and and is a great way to find your exact cruising group. The Facebook group was incredible. I got to know a ton of new people, many of which had cruised with Disney several times before, so they were a wealth of knowledge. We chatted for months leading up to the cruise, had a meet and greet on the ship, and have kept in touch afterwards as well. I even found a gal who went to the same school as I did, but we had missed each other by a year or so. We had a ton of stuff in common and it was great to meet her on the ship. Also, this is how you'll join an FE group as well!
6. Know What is Included in "All Inclusive" and What Isn't
The ships are "all inclusive", but there are plenty of things that you can pay for if you choose to. Know what is included in your cruise price and what isn't ahead of time so that you can plan accordingly. For example, alcoholic beverages aren't included, but I knew that we could bring our own liquor onto the ship. Do your research and plan ahead. We had a good idea of what extras we'd be doing so we'd planned ahead for the extra charges we'd be getting at the end of the cruise. If you didn't know about the extras like gratuity, port adventures, professional photos, specialty drinks, or adult dining, you'd be in for a shock at the end of the trip when they slide the bill under your door.
7. You Have to Book Ahead for Princess Meet & Greets
This was one of the things I learned from the Facebook group that was incredibly helpful. When you are on the ship, there are lots of opportunities for meet and greets with the Disney Characters. You get a list of the times and locations for each character in your Personal Navigator each night and then just show up (and wait in line) to meet them. You have to get a ticket (this is free) to meet the Princesses though, and I thought it was brilliant. No big lines, and you are guaranteed to meet each one. I knew of this ahead of time and went straight to guest services when we got on the ship to reserve our spots for Anna and Elsa, and the Princess Gathering. You are now able to book these online when you do your check in for your cruise. I highly recommend reserving them online before hand. I found throughout the week, that a lot of people didn't know about needing the tickets, and there weren't any available by the time they went to get them. Totally worth doing if you have a little girl.
8. Dress Up for Pirate Night, Formal, and Semi Formal Night!
This was another really fun part of the trip for me because we got to do things we don't normally do at home. The theme nights aren't required, but are something I highly recommend! We loved Pirate Night, and went all out. There is a Pirate Deck Party that night too which the kids (and the adults) loved. I loved getting dressed up for Formal and Semi Formal night too and taking pictures all dolled up. I mean really, how often do you get the chance to be a pirate and take pictures with Captain Jack Sparrow?!? All the characters were dressed up as pirates that night!
9. Plan on Palo
I went back and forth on whether or not to make a reservation at Palo, the adult only restaurant on the ship, but am so glad that we did! You can choose either brunch or dinner (or both!) and there is a dress code. We did brunch on our last sea day and it was amazing! I've heard the dinner is incredible as well, but that you shouldn't miss the brunch. Brunch is more my style of food, so that's what we went with. It is an additional cost (On our trip it was $25 per person, plus gratuity, but I believe it is now $30/person), but it was well worth it. I made our reservation when I did our online check in, but you can do it at Guest Services on the ship as well.
10. Plan on Doing Some Planning
I had seven months to think about and plan our trip, which I loved. As I mentioned before, I over research everything, and that gave me plenty of time to do that. I felt like we got to really enjoy our trip because I had planned ahead and could pack accordingly (packing post coming soon), knew what to take advantage of on the ship, and what port adventures were worth while. Can you hop on a cruise ship with little planning and enjoy it? Sure! However, I like to get the most out of my money and am glad that I spent time planning everything out.
I've also added another post with more cruise info here!
Tuesday, February 17, 2015
Disney Fish Extender Gifts for Kids!
These are the Fish Extender gift bags I put together for our upcoming Disney Cruise! If you aren't familiar with Fish Extender gifts, you can read more about it in the post I wrote about the gifts I did for the adults in our group here.
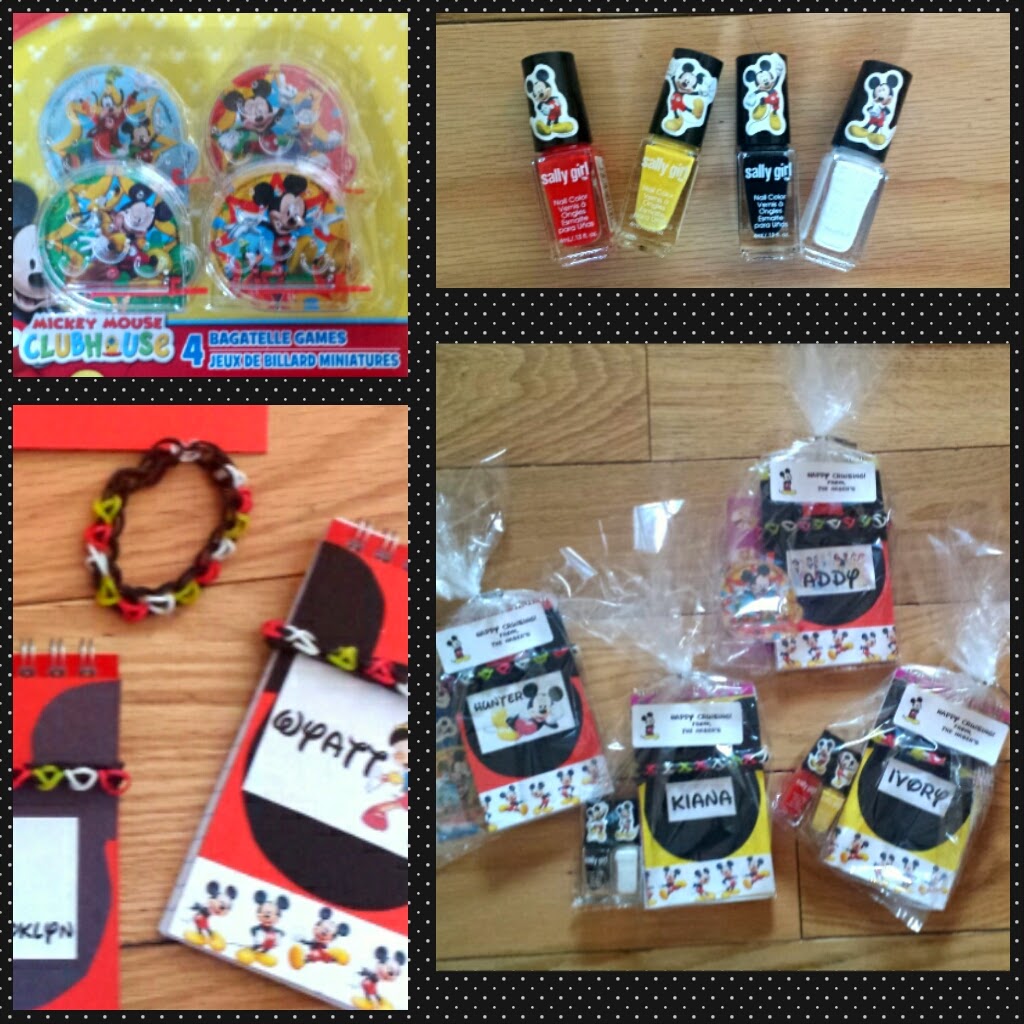
We had 25 kids in our group to do gifts for, and their ages ranged from 10 months up to 13 years old. It was a little tricky trying to come up with something that most everyone would like without having to do a lot of different things. I also wanted to incorporate each child's favorite character (this was provided in the list for our group), and again wanted something that wouldn't take up a huge amount of space in our suitcase. In the end, I decided to make some little personalized notebooks for each kid as the main gift, and then throw in a couple little items to go.
I got 3 packs of spiral notebooks for $1 each at the Dollar Tree store. The covers were tinted plastic which I knew I'd need to cover. I cut rectangles out of cardstock paper and attached it to the outside and inside of the plastic cover sheet. I used spray adhesive to glue the paper on because regular glue won't adhere to plastic. Once thaMt had dried, I cut out the Mickey Mouse head shape from black cardstock and glued it on with a permanent glue stick. I made each of the kid's name tags in Microsoft Word by typing their name in the Disney font and then adding an image. I just printed them, cut them out, and then glued them on top of the Mickey head. I also added a strip of paper at the bottom that I cut from some Mickey Mouse scrapbook paper.
For the extra goodies, I did a small sheet of stickers for each kid, and also a little Mickey Mouse ball game that I got at Dollar Tree in packs of four in the party favor aisle. For the couple of teenage girls in our group, I got itty bitty bottles of nail polish in Mickey colors and then added the Mickey stickers to the top. My kids wanted to be part of the process (or I may have told them they needed to be...), so they made a Rainbow Loom bracelet for each of the kids using this pattern from Loom Love. I slipped the bracelet around the notepad, added the stickers and game to the bag, put on a label that I made, and that was that.
I had so much fun putting the Fish Extender gifts together! I can't wait to see the gifts we get from our group, and I definitely will do this again when we do another Disney Cruise!
Monday, February 16, 2015
Disney Fish Extender Gifts for Adults
We are going on our first Disney Cruise this week, and I have done a ridiculous amount of research for the trip. When I read about Fish Extenders, I knew we had to do them. One, I love to craft, and two I love to give gifts, so it was a win/win for me.
The first thing you need to do when you decide to to do a Fish Extender (FE) program is join a group. If you skip this step, you'll end up leaving gifts for other people and not receiving anything. If you go to the Disney Cruising group on Facebook, you'll be able to locate your specific cruise date/ship and join a group. I love our group on Facebook where we can all chat, ask questions, and get to know each other. It has been a very valuable tool for me. I can't wait to meet everyone on the ship!
You'll also need to have a FE to hang outside your stateroom door. You can buy them already made (tons on Etsy), or you can make your own. I sew, but hate making patterns, so I bought a pattern on Etsy for $4.50 from The Rabbit's Hole Shop and it was worth every penny.
Here is a picture of the one I made...
For our group, I made gifts for the kids and for the adults. In this post, I'm going to show you the gifts I made for the adults. Kids FE gift post can be found here.
I wanted to make gifts that were functional, but also could be kept for souvenirs from the trip. I also wanted something that was light weight and easy to pack. The doors on the Disney ships are magnetic, so for one gift I made a little dry erase board to hang on the door and added a magnetic dry erase marker with it. I cut 5x7 sheets of white paper, got the Disney Cruise Line logo online and added the text to it I made these into stickers), and then cut some Mickey Mouse scrapbook paper to add as trim to the bottom. I got a Scotch Laminator for Christmas (Thanks brother!) and used 5x7 sheets to laminate the boards I'd put together.
I bought a roll of adhesive magnets, cut them and attached them to the backs of the boards.
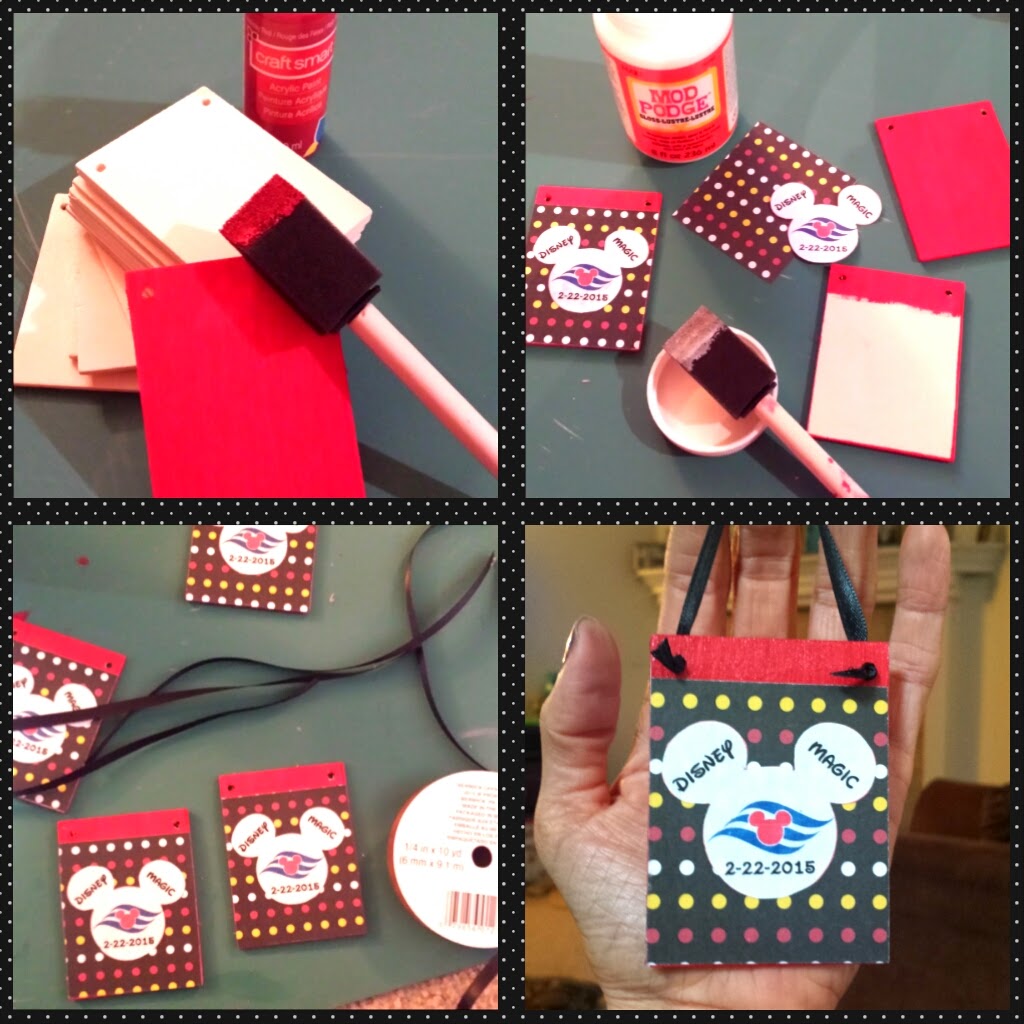
The other item I decided to make was a Christmas ornament. I thought it would be a fun thing to hang on the tree each year and to remember the trip by. I bought some wooden rectangle plaques that already had holes drilled (ArtMinds brand at Michaels that came in a pack of 8 for $1.99). I painted them, cut out squares of scrapbooking paper (from the same Mickey Mouse pack I used above), made the Mickey ear shaped logos with the cruise ship name and date, and used Mod Podge to attach everything. I then cut ribbon, threaded it through the holes and knotted the ends. I finished the ends with a fray stopper, but you could use heat to seal the ends as well.
I got clear bags from the Dollar Tree store and packed the gifts up with some little labels I made.
Monday, November 10, 2014
Chunky Necklaces!
My daughter loves to accessorize, and is a big fan of the chunky necklaces that are all the rage with little girls. I've been buying them for her for awhile now, and recently decided I'd start making them for her myself. I spent a lot of time researching techniques, scanning the internet for the cutest beads and pendants, and then went to work. I've listed a handful in my Etsy shop Star Creek Creations, and will be adding more over the next few weeks as I get new pendants and beads in. I had no idea how much I'd enjoy picking beads out, putting combos together, and filling my house (and hopefully now yours!) with adorable chunky necklaces.
Thursday, July 3, 2014
Music - Wes Kirkpatrick
My brother Wes is a musician. Actually, my brother Ryan is too, as well as my dad, and my grandfather played the mandolin. I guess the music and singing talent skipped me and went to them instead, because I can't sing to save my life. I'm not what we're talking about here though, so I'll get back on topic. My brother Wes recently spent a few weeks in Bozeman, Montana recording a new EP album, and it is going to be nothing short of incredible. As an independent artist, he doesn't have people footing the bill for studio time, production, etc. and those items are not cheap. It is both good and bad, because he has total control in how his songs are recorded and owns all the rights, but the downside is that he has to pay for all of it. The glory of Kickstarter campaigns has been such a blessing to independent artists like my brother. It gives fans an opportunity to help make the album happen. There are different pledge amounts and different products (like a signed CD or VIP tickets to an upcoming show) to pick from. You essentially place a pre-order and then when the campaign goal is reached, everything gets made and sent to you. Pledges start at $5 and can go up as high as you'd like. If you haven't heard of Wes Kirkpatrick before, take a minute to watch his Kickstarter video, consider supporting the release of the new EP, and share it with your friends. Your support is greatly appreciated! https://www.kickstarter.com/projects/1783311538/wes-kirkpatrick-a-new-ep
Monday, June 23, 2014
Kids Chair Refinish Project
A couple facts: I love elephants, and I love projects. My neighbors across the street were in the process of moving a couple months ago, and I spotted a little chair with an elephant on it in their driveway with their stuff they were having picked up for charity donation. I sent her a quick text and asked if I could have it, and then sent my kids over to pick it up.
It was an adorable little metal chair, with peeling white paint, some rust, and a faded seat. I knew I could bring it back to life and that it would be perfect for my daughter to lounge in on the deck.
I started working on it by taking the seat off (there were 12 screws holding that tiny seat on!) Next, I sanded the areas that were rusted, and then primed it with a spray primer for metal. The trim on our house is a light tan color and I wanted something that would coordinate with that. The fabric I picked (Outdoor canvas fabric from JoAnn Fabrics. Normally $19.99/yard, but it was on 50% off that week) was a mix of turquoise, tan, and white, so I went with an Almond color for the metal part of the chair. I sprayed two coats and that was that.
I decided to use the existing seat for the chair and just cover it with new fabric. I laid the seat on the fabric and just eyeballed how much to cut out. Getting it back on the chair was tricky, and would have been easier if I had a couple extra hands to hold the fabric tight, while I screwed the screws back in. No such luck on the extra hands, but I made it work.
I think it turned out great, and my daughter is thrilled to have her own little chair to sit in!
Subscribe to:
Posts (Atom)
South Dakota Family Vacation
South Dakota Family Vacation! My family took a vacation to South Dakota when I was a kid and I've always had great memories o...
-
We are going on our first Disney Cruise this week, and I have done a ridiculous amount of research for the trip. When I read about Fish Ex...
-
These are the Fish Extender gift bags I put together for our upcoming Disney Cruise! If you aren't familiar with Fish Extender gifts, ...
-
I wrote some blog posts after returning from our cruise on the Disney Magic a couple months ago (find them here , here , here , and here ),...